


The Berkey water filter is a revolutionary product that provides clean, safe, and great-tasting drinking water for families worldwide. The Berkey water filter is an environmentally friendly product made with non-toxic materials. It is easy to use and can remove more than 99.99% bacteria and other contaminants from any water source. How to build a Berkey water filter?
Building a Berkey water filter is one of the most effective methods. This powerful system uses gravity to filter out harmful contaminants, giving you clean, healthy water. You can quickly build your own Berkey water filter with just a few basic supplies and some basic instructions. So, let’s learn how to build a Berkey water filter.
How To Build A Berkey Water Filter: What Materials You Need & Where Can You Get Them?
Now comes the materials you need how to build a Berkey water filter.
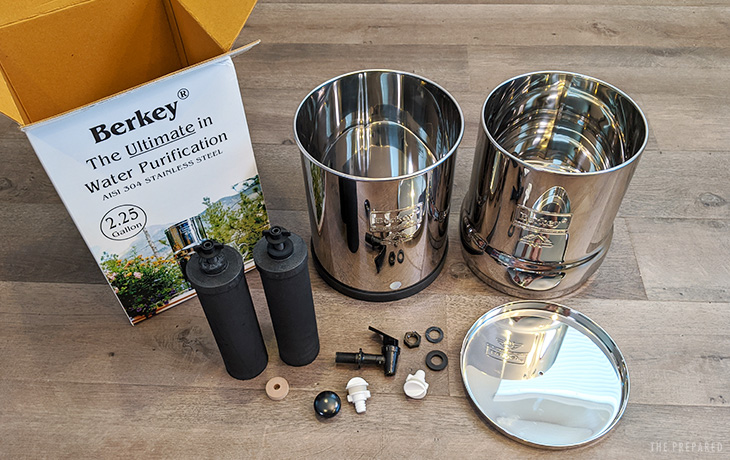
Initially, you should acquire two 5-gallon food-grade plastic storage pails with lids. These are generally obtainable for free from grocery store bakeries or eateries, though they may be more difficult to find than in the past.
Please Note: Avoid taking any containers that are meant for pickles! You can purchase any free ones online if you cannot locate them.
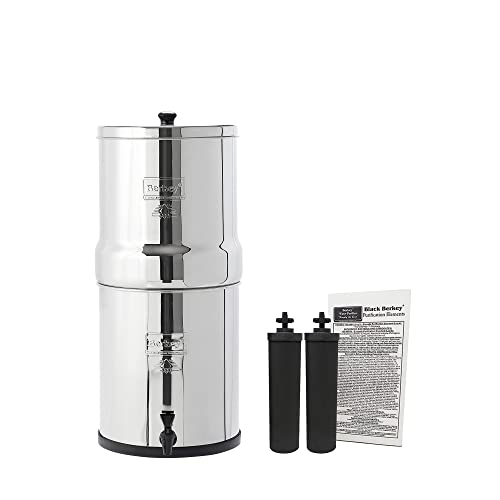
The second thing you require is 2 black Berkey filter elements, which come in pairs.
Lastly, you’ll require a spigot. You can choose from plenty of styles.
How To Build A Berkey Water Filter: Tips For Setting Up Your Berkey Water System
Here are the tips on how to build a Berkey water filter:
- Make sure to clean the stainless steel containers before assembling them
- Before putting them into place, it is necessary to prime the filters, or the water filtration process will take an incredibly long time.
How To Build A Berkey Water Filter: Setting Up A Berkey Water Filter

Here are the steps on how to build a Berkey water filter:
1. Put On The Silicon Ring
Grab the silicon band and put it down on the work surface. Then, place the bottom Berkey container on top of the silicon band.
The silicon band provides stability to the Berkey, preventing it from moving around. This is especially beneficial for households with children, who might otherwise be able to drag it out from its place easily.
2. Place The Handle On The Lid
It is accompanied by something that appears to be kitchen fixtures. Follow the below steps:
- Put the screw into the washer
- Take the screw & washer and put them into the underside of the lid, into the hole
- Screw the handle onto the lid
3. Install The Spigot
Customers who buy only the Berkey unit will receive a plastic spigot, while those who purchase the bundle package will come with a stainless steel spigot.
I’ve had the plastic spigot for quite a while, but I recently opted for stainless steel simply because I prefer stainless steel to plastic.
Regardless of the type of spigot – stainless steel or plastic – the installation process is the same. The primary distinction lies in that the plastic spigot utilizes plastic components while the stainless steel utilizes stainless steel parts. In addition, the plastic doesn’t have metal covers.
Follow the below instructions:
- Take out the blue plastic from the two metal washer-looking pieces
- Put the metal ring on the spigot tube with the round part closest to the spigot
- Put one of the silicon gaskets on the spigot tube. This will create an excellent seal on the Berkey so that you won’t face any leakage
- Put the spigot tube into the hole in the bottom canister
- Insert the other silicon gasket into the spigot tube on the inside of the canister, and then place the metal ring with the wider section touching the silicon
- Secure the metallic nut to the tube with a strong grip. If the Berkey begins to leak, the nut is not firmly attached.
4. Install The Filters
I am going to install the black carbon filters. If you have bought the bundle deal, you’ll receive the black carbon filters & the fluoride/arsenic filters.
After checking the water for fluoride and arsenic, I found no issues, so I will demonstrate how to install the black carbon filters. Installing the fluoride filters is quite similar, though.
Install the filters by following the below steps:
- Be sure that the filters have been adequately primed before setting them up
- Attach the gasket to the dark filter component, and afterward, insert the part with the tube pointing downwards through one of the openings on the upper container
- Secure the screw nut with a tight fit, but be mindful not to make it overly tight, or else you may end up damaging the screw
- Similarly, do it for the other black element.
5. Add The Stoppers Or More Filters
Currently, there are two choices you can make: you can fit additional charcoal filters to the other gaps, which will cause it to purify the air more quickly, or you can add plugs.
In the past, I never experienced any difficulty with double filtration. But, after running a red dye test, I identified that one of the components was damaged at some point.
As they come in a group of three, and I don’t want to discard one of them, I plan to put the third filter on my own and then plug the fourth opening.
The primary purpose of the stopper is to prevent the unfiltered water from flowing into the chamber of water that has already been filtered.
Insert the plug into the aperture by pushing the narrow end through. Perform the same procedure on the opposite side.
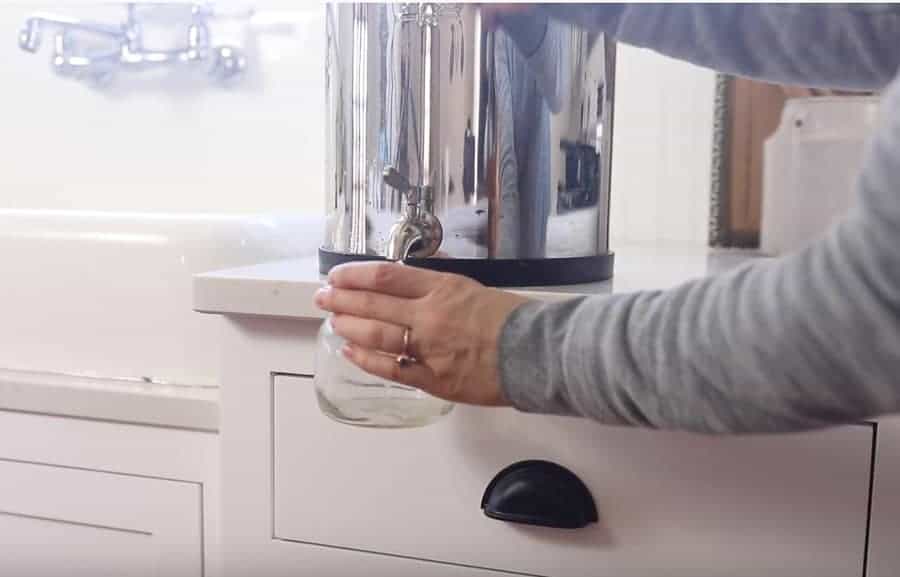
6. Test The Berkey Water Filter System
Follow these steps to test the Berkey water filter system:
- Pour liquid into the upper container and ensure that the fluid is draining correctly. You must ensure that the material is passing through the filters and is not seeping out of the nuts or blocked openings.
- Lift it and assess which spot the liquid is leaking from. I can observe that the liquid leaks out of the filters and through the filter tubes.
- If water is flowing through areas, it shouldn’t be, drain the liquid and make sure the nuts on the element are securely tightened. Perform another check.
7. Finish Up
Now come the final steps:
- Place the uppermost container on top of the lower one, fill it with water to the brim, and cover it with the lid
- Before consuming the water, let it pass through the filter multiple times and any particles that might be caught in the filter are flushed through
Everything is ready for you! Have a great time drinking your yummy processed water.
If you have been using your filters for some time and want to ensure they are still performing their task effectively, you can do the red dye test to confirm.
Now, you know how to build a Berkey water filter.
FAQs (Frequently Asked Questions) On How To Build A Berkey Water Filter
1. How long does water stay fresh in a Berkey?
Change your Berkey water every 3 days. If the water is stored in a cool place, it can stay fresh for up to 7 days.
2. Can mold grow on Berkey filters?
It is not frequent, but you should clean your Berkey regularly to avoid mold growth. The Black Berkey Filters come with a unique, proprietary media that includes silver, which can inhibit bacterial and fungal growth. A buildup of minerals likely causes any white residue that appears.
3. Can you drink lake water from a Berkey?
Berkey water filters efficiently convert lake water or any other water supply into clean, safe water that can be used for drinking, cooking, and hygiene. The longevity of the Black Berkey elements is so impressive that you can utilize the Berkey water for any of your water requirements.
Summary: How To Build A Berkey Water Filter
Thus, you now know how to build a Berkey water filter. If you already own a Berkey water filter system or want one, you can use this guide to make your own.
You have successfully built your own Berkey water filter! Now, it’s time to test it.
Let’s say that you have just finished the installation process and want to ensure everything is working correctly. For best results, leave the system running for 2-3 hours.
After this time, remove one of the filters and take a good, hard look at it. If you see any discoloration on the side of the filter, discard it and start over. If you decide to discard this filter, you should always discard the whole set of filters, as one is permanently damaged.
The only caveat is that the system will only be as effective as the filters you use. The more filters you use, the better the water will be.
I hope these steps were helpful. If you have any queries regarding how to build a Berkey water filter, please feel free to reach out via comments.